Monday, July 21, 2014

Over The Rainbow

                                                                                                                                             *Samples*


Sorry I have been absent from blogging for a while. I've been too busy to paint my nails for the last few weeks, but I'm back with another lovely Essence polish. This is a Colour & Go polish called "Over The Rainbow" and it is a pale purple-blue with an almost holographic turquoise/violet shimmer. It doesn't photograph well, but it is very pretty.


I used Cheeky Jumbo stamping plate N and tried out the black Essence Stampy polish. It is very opaque, but dries super-fast so you need to work quickly or the design won't transfer fully (see my index finger). The consistency is similar to the Konad stamping polish.

I finished with Essence Gel Look Top Coat, which didn't smudge the stamping and I have found to be pretty chip resistant.


Essence products are now available from your local Wilko store or through www.wilko.com who currently have a 3 for 2 sale on Essence products .

Friday, June 27, 2014

'It's Raining Men!' and 'Circus Confetti'

                                                                                                                                           *Samples*                         


Just a quickie post to show off the two Essence polishes I'm wearing at the moment. The blue base is a Colour & Go polish called 'It's Raining Men!' which is a gorgeous blue polish with blue and pink-purple shimmery bits. Like all the Colour & Go polishes I've tried, it dries super fast, is opaque in two thin coats and and dries to a glossy finish.

The glitter topper is from the 'Nail Art Special Effect Topper' range and is called 'Circus Confetti'. It's a clear base with silver, bright pink, light pink, green, blue, gold and red metallic hex glitter in a range of sizes. This polish applies nicely and doesn't require any fishing for glitter. It dries very fast. It is labelled as '3D Glitter' which is a bit misleading as the glitter actually lies completely flat leaving a finish so smooth and glossy that it doesn't require a top coat.


I love this combination, and the colourful glitter topper makes me very happy!

Wednesday, June 25, 2014

Oooh Sparkly! - Playing with Essence Polishes

                                                                                                                                           *Samples*


This is more a swatch and review post than a nail art post, which is a good job really because this is not the neatest nail art I've done! I decided to have a play around with some of the Essence products I got at the blogger event.

I started by using Studio Nails Ultra Nail Repair, which is a nail treatment and strengthener with keratin that also acts as a ridge filler and basecoat.  This dries very quickly and did a good job of making my damaged, uneven nails look smooth. I'll be continuing to use this as a basecoat every time I do my nails to see whether the condition of my dry, peeling nails improves.


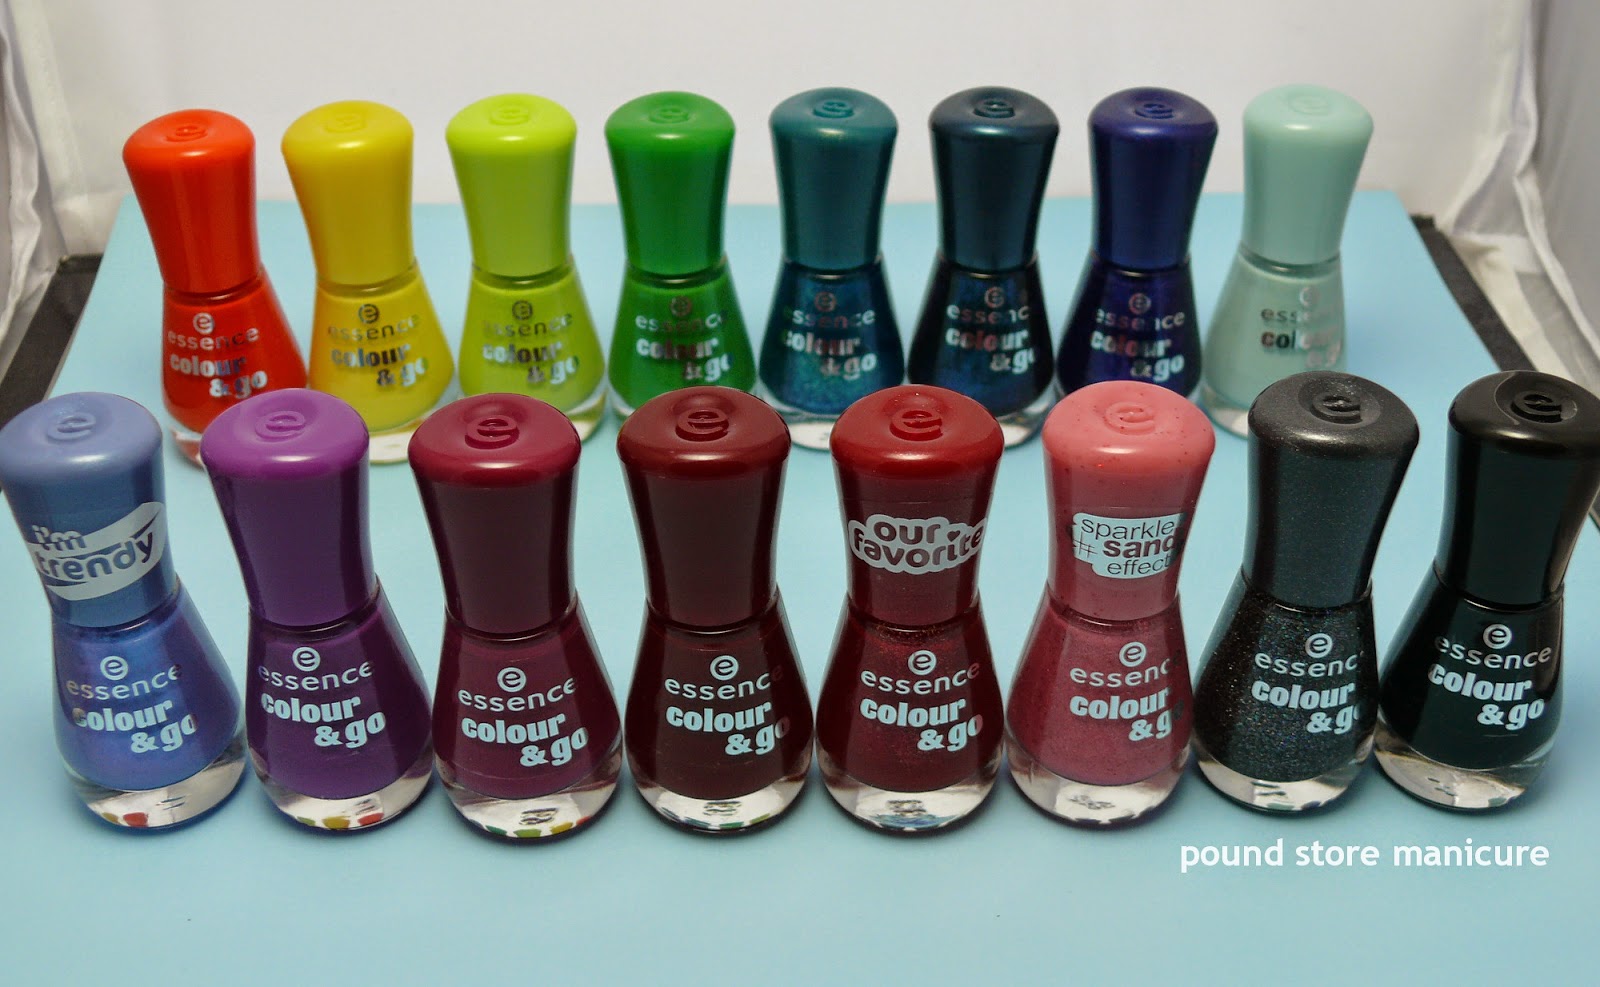
I decided to use two polishes with different finishes from the Colour & Go range. That's What I Mint! is a pale minty seafoam green creme. I am a sucker for polishes in the pastel turquoise/peppermint colour family, and this one just became my new favourite. The brushes in the Colour & Go bottles are perfect. They have a broad, flat shape, similar to the brushes in Rimmel polishes, which means that you can cover the whole nail in one or two strokes. The polish applies very smoothly and doesn't have an unpleasant "cheap polish smell". It only takes two thin coats for full coverage, which is remarkable for a budget priced pastel shade! It dries really quickly, as fast or faster than any of the quick dry polishes I own. The finish is incredibly glossy and smooth, like a gel finish.

Miss Universe is a stunning sparkly polish that is hard to describe and harder to photograph. It has a dark, almost black, base and is crammed with blue microglitter that sparkles green and purple in different lights. It is gorgeous and I can't stop looking at it. It might actually be the prettiest polish I own. Just like the the creme polish, it is opaque in two thin coats, it applies smoothly and dries super fast. It dries to a nice shiny finish but isn't quite as glossy as That's What I Mint!.

I love everything about these Colour & Go polishes! These polishes cost £1.59 for 8ml. The bottles are really cute and the matching caps make it easy to find the shade you want if your polish collection is stored in drawers or boxes.


I decided to paint some triangles using an Essence striping brush and Miss Universe. Unfortunately I didnt work fast enough with the super quick drying polish and made a bit of a blobby mess. I'll know to speed up next time! I tried to disguise my messy edges by adding some white stripes in Sinful Colors Snow Me White. It wasn't a huge success.


I decided to top some of my nails with one of the stunning Special Effect Toppers from Essence, called 23 Million Dollar Baby. It's a clear base with chunky semi-transparent holographic hex glitter. Over a pale polish it looks really pretty and quite subtle, over a dark polish it really stands out and the glitter looks orange and green. I think I prefer it over the pale That's What I Mint! polish. Be careful if you tend to smoosh glitter polishes around to get an even distribution - this polish dries super-duper fast and you could easily end up making a gloopy bubbly mess. My nails began to succumb to that fate!

I topped everything with Essence Gel-Look Top Coat. This top coat applies well and does give a lovely shiny finish, but not quite as shiny as the super glossy finish that That's What I Mint! had to start off with.

I also used this opportunity to try out the Express Dry Spray. I let my first coat of Colour & Go polish dry naturally then used the Express Dry Spray on the second coat. To be honest, the Colour & Go polishes dry so quickly anyway that it's hard to see any difference. I think I need to try it out on one of my slow drying non-Essence polishes to see how well it works.

I also tried the Express Dry Drops which are an oil that come in a dropper bottle. I used them over the Gel-Look Top Coat. Because I am daft, I used the drops on both hands so I have no way of comparing drying time (I'll remember to only do one hand next time). The drops do seem to prevent denting while the polish dries. Because your nails are oiled, things seem to glide over the soft polish without damaging it, particularly clothes. The oil also moisturises your cuticles with almond oil and vitamin E.


Essence products are available from stands in Manchester Arndale and London Westfield, and are coming to a Wilko store near you, and Wilko online, this July!

Tuesday, June 24, 2014

Essence Launch

                                                                                                                                                                                                                                                                              *Samples*


Hello fellow nailoholics! Sorry I haven’t posted anything for a couple of weeks. My poor laptop had to go in for repairs and after two weeks of being poked and prodded by experts it is still not behaving itself.

To make up for my absence, I have a mega post full of nail polish and makeup that are brand new to the UK market. On Sunday I spent the day at my first ever cosmetics launch for bloggers and I am still giddy with excitement.


Essence is an established European budget makeup brand, based in Germany, with the widest range of products I have ever seen, and now they have arrived in the UK. The majority of their products are made in Europe. Essence does not test their products on animals and they have very strict controls regarding ingredients. Essence products are already available from retail stands in Manchester Arndale and London Westfield shopping centres, and will be sold in all branches of Wilko from July (very exciting for me because Bolton has a large Wilko store).

I took my Mum to the launch with me and we had an incredible girly afternoon.  As soon as we arrived we were given bulging goodie bags and shown to tables piled high with products for us to try out. We watched a short presentation and then we were shown to a large stand of products, just like you would get in a store, and told to help ourselves to anything and everything that we wanted to try, all free of charge.


At first it felt very strange, almost like stealing, and I limited myself just to some nail care products and a few polishes.  Even the more experienced bloggers seemed to be a little overwhelmed by this “take anything you like” system. As the afternoon went on, every time a product was getting low on the stand, Essence staff would instantly refill it. They were incredibly helpful and friendly, answering questions and recommending products. After a few hours, everybody had forgotten their initial trepidation about helping themselves and had bags bulging with makeup.

We were provided with yummy food and unlimited hot and cold drinks, then we were all taken to the new Essence stand in the middle of the Arndale shopping centre, where we were given another goodie bag and posed for some photos. The Essence stand at the Arndale even has a giant nail polish bottle made entirely out of bottles of nail polish!


I ended up with so much stuff that I’ll be trying out Essence products for months. I’m not exaggerating. Here are  some of the things I came home with: 


Nail Care
Essence produces lots of nail care products, including at least four types of cuticle conditioner, a few types of cuticle remover, nail hardeners, strengtheners, conditioners, files and buffers.  These are the nail care products I picked up - less than a third of the full nail care range.  I’ll be trying these out over the coming months and I will let you know the results. 


Nail Polish
The range of colours and finishes of nail polish from Essence is incredible! Even for a premium priced brand the range would be impressive, but all of these polishes retail at £1.59 - £1.79 a bottle. I love the cute Colour & Go bottles. They have plastic caps which exactly match the polish shade inside, even the shimmery and glittery ones. This will make it super easy to find the right shade if you store your polishes in drawers or boxes. I was pleased to find that they don't have the unpleasant chemical smell that many budget polishes have. I picked up a whole bunch of these and it's still only a tiny fraction of the shades available.


The Effect and Special Effect polishes are an assortment of unusual glitters and toppers that all look really pretty. I picked up a selection but there are loads more available. They also have a range of pretty pastel polishes called Nail Candies that contain hardener and conditioner and smell sweet and fruity. I will be doing some swatches, reviews and nail art with the Essence polishes very soon! 


Gel Nails
Essence have their own home gel nail system called Gel Nails At Home, which involves using a peel off base coat, any ordinary Essence nail polish, followed by a gel top coat (available in clear and several different glittery finishes). I even got a free USB mini UV lamp for curing the gel! Essence claims that Gel Nails At Home stay looking good for up to ten days. Unfortunately I forgot to pick up the primer and cleanser, so I won’t be able to try this out until I have been back into Manchester to buy some.


Nail Art
Essence has a really wide variety of nail art decorations, stickers, pens, jars of embellishments (caviar beads, flocking, glitters), stamping plates, stamping polish, nail art brushes and tools. They even have ‘design your own’ nail stickers. They also have transfer paper in a selection of designs and transfer liquid – I can’t wait to try these out! I'm also very excited about the Magnetic Top Coat and pattern magnets which work over any polish.

Essence also sells Express Dry Drops and Express Dry Spray to speed up nail polish drying times. I picked up both of these and I'll be trying them out when I do my nails tonight.


I also got a selection of makeup in the goodie bags. I will be swatching and reviewing some of it soon alongside my usual nail art posts.

Check out some of the Essence products coming to your local Wilko store in July! 


Wednesday, June 11, 2014

Cupcakes


Over at Nailpolis a new cupcake badge has just been launched and this inspired me to indulge my sweet tooth and make some cupcake nails. I have a major weakness for cake and I'm having a hard time resisting the urge to lick these sugary nails!

For the bases I used three coats of Rimmel 60 Seconds in shade Sweet Lavender (Poundworld), which is the pinky lilac, and N.Y.C In a New York Minute in the very appropriately named shade Cupcakes And Latte (£1, Bolton Market), which is the minty green. Both of these shades scream fancy cupcake frosting to me!


I painted the little cupcake details using a fine paintbrush and some acrylic paints for the cake cases and the frosting was done with nail polish and a dotting tool. I added some matte white caviar bead sprinkles and deep pink caviar bead 'cherries' on the frosting of each little cake. I painted the big cupcake using Sinful Colors Snow Me White and pale blue acrylic paint for the case and Rimmel Sweet Lavender, Sinful Colors Snow Me White and MUA Frozen Yoghurt for the frosting swirls.

I used a mix of matte pastel, gold and silver caviar beads for sprinkles and placed them onto a coat of clear nail polish (L.A.Colors Voltage) using a cocktail stick dipped in polish. I topped everything with Limited Collection Matte Top Coat (Marks and Spencer).

What do you think of these sweet treats? I don't know about you, but I'm craving cake now.

Wednesday, June 4, 2014

I Am Cyborg


I have been meaning to do some electronics themed nails for ages, so yesterday I made these printed circuit board inspired false nails using genuine electronics components. I am really pleased with the way they turned out!


I used two coats of Rimmel 60 Seconds in shade Jungle Fever (Poundworld) as the base colour as it is the closest shade I have to a PCB green. I used a brass coloured metallic Vallejo acrylic model paint and a fine brush to paint the circuits. Once everything was dry, I trimmed the wire off some assorted resistors and an LED and attached them to the nail using superglue. If you want to recreate this look but don't have a big tin of electronics components like I do, resistors and LEDs are cheap and can be bought individually from online suppliers or your local Maplin or independent hobby-radio store. The total value of all the components on these nails is probably about £1.

Tip: nail glue and cheap superglue are exactly the same stuff, cyanoacrylate, but when buying from discount shops cheap superglue is often fresher than cheap nail glue (cyanoacrylate starts to get less effective 12 months after manufacture) because they sell much more of it.

I used L.A.Colors Top Coat on the nails after I'd glued on the components. Using the top coat afterwards helped disguise any areas where I'd been sloppy with the glue.


What do you think of these nails? Have you ever created nail art using unusual materials?

Tuesday, June 3, 2014

Experiment with Texture


I'm not in love with these nails. In my imagination they were amazing, but in real life I'm feeling a bit 'meh' about them.

I used false nails with one coat of Maybelline Color Show in shade Cool Blue followed by three coats of Technic Mermaid (£1, Bodycare), my all time favourite glitter, which is a mix of medium and small turquoise holographic hex glitter. I love how holographic glitter looks with a matte finish, so I added a coat of Limited Collection Matte Top Coat (Marks & Spencer).


I used strips of clear sticky tape to mask a wide stripe down the centre of each nail and used Sally Hansen Sugar Coat in Laughie Laffy, the dark blue, and Sugar Fix, which is white (from Poundland and Poundworld), to create textured stripes down each side of the nail. The stripes came out a bit untidy which was disappointing.

Although I'm not thrilled with these nails, they have inspired me to play with contrasting textures and finishes in future nail art. What do you think?

Thursday, May 29, 2014

The Lacquer Legion Challenge - Garden


I love these nails! They are so happy and summery.

I used false nails again for this nail art, but my natural nails are almost back to full health after a few weeks of using nothing but cuticle oil and Sally Hansen Maximum Growth on them. I'm not sure it makes them grow any faster, but it does seem to improve the condition and prevent dryness and splitting (my main nail issues).

The prompt for this month's Lacquer Legion Challenge was "Garden". I loved this prompt and had no trouble finding inspiration as my own tiny garden is currently a riot of colourful flowers and interesting creepy crawlies.

I used a few polishes for the bases of the nails. The lime green is Constance Carroll in Neon Green, which is not really a true neon and is often available in discount stores for about 50p a bottle. The froggy green is N.Y.C High Line Green, usually available in 2 for £2.49 deals in Superdrug. Unfortunately it is one of those polishes that goes gloopy and difficult to work with after being open for six months. The blue is Cool Blue from the Maybelline Color Show range (£2.99 but often available in 3 for 2 deals at Boots).


I painted grass on some of the nails using the green polishes and a striping brush, plus Jungle Fever, a forest green from the Rimmel 60 seconds range. The clouds were done using a dotting tool and Sinful Colors Snow Me White. The beetles were done using a large dotting tool and a Miss Sporty Metal Flip polish in shade Fiery Blaze, which is a purple to olivey gold duochrome polish that I love and don't wear often enough (£3 for 2 at Superdrug). I drew the details on the beetles with a fine black waterproof indian ink art pen. I don't recommend this though as it turns out it isn't very top coat proof!

I used some matte caviar beads I bought on ebay a few months ago. This is the first time I've used them and they are great. As they don't have a metallic coating there is no way the colour can fade or bleed with top coat and they remind me of sugar sprinkles on cakes. I used L.A.Colors clear polish (shade name Voltage) and placed the caviar beads using a wooden cocktail stick dipped in a little polish. I added a fimo butterfly from my wheel of fimo butterflies from Poundland. Everything was topped with a thick coat of L.A.Colors Top Coat and left to harden overnight (thank goodness for false nails!).


What do you think? Did you do any garden themed art for the Lacquer Legion Challenge this month?

Saturday, May 24, 2014

Glitter! GLITTER! Mwahahahaha!


Sorry I've been terrible at blogging over the last two weeks, I've just been so busy! Today I have some photos of the nails I wore for my in-laws ruby anniversary party last weekend. I think these are my favourite nails so far.

I took inspiration for these nails from these inverse glitter nails by Narmai over at PiggieLuv, and the dress I wore to the party, which was black with blocks of a predominantly blue and red pattern and an asymmetric collar.


I started by painting a coat of L.A.Colors Base Coat onto short square false nails, followed by one coat of N.Y.C. Water Street Blue, one of my favourite blue shades and the only polish I used for these nails that cost more than £1 (it cost £2.49 for 2 bottles at Superdrug). Once that was dry I started with the glitters. First was a coat of Jess Sea Breeze (Poundland exclusive), a mix of small square silver holographic and turquoise glitter with turquoise micro glitter. After that I used a coat of Technic Mermaid (Bodycare or lovethymakeup.com), a mix of medium and small holographic turquoise hex glitter which I adore so much that I've almost used up a whole bottle in six months. I followed with a coat of Pretty Graffiti Effect polish (available in Poundland and Poundworld) in the confusingly named shade 'Blue' which is a mix of medium sized red and turquoise hex glitter and gold and red bar glitter. To finish of the mass of glitter, I used another coat of Technic Mermaid.

Once all the glitter was dry I painted the inverse design using a striping brush and Jess Midnight, my favourite super-opaque budget black polish. I forgot to photograph this polish along with the other bottles. I finished everything with a coat of L.A.Colors Top Coat.


I am loving the L.A.Colors top and base coats at the moment. The base coat really seems to extend wear and the top coat is glossy, chip resistant and applies more smoothly than my usual more expensive top coat. I took the above photo of the nails after they had been worn all night, bashed around a lot (I'm not used to having longer nails!) and then pried off while a little drunk, and the only wear they show is at the base from when I removed them. I hadn't anticipated that the Nailene adhesive nail tabs I used were going to be quite as strong and stubborn as they were! I highly recommend them if you want to wear falsies for a few days but don't want to damage your nails with glue.


I loved wearing these nails. They are so glittery and full of holographic sparkle, yet they are still quite sophisticated looking and the colours matched my dress so well. What do yo think? Have you tried any inverse nail designs?

Monday, May 19, 2014

Party Nails for a Lovely Lady


On Thursday I painted someone else's nails for the first time. My wonderful in-laws celebrated their 40th wedding anniversary on Friday and had party at a local social club. My Mother-In-Law wanted some black and white nails to match her jumpsuit so I turned up at her house armed with a box of nail supplies. I have major envy about her nails. She has the kind of super-strong natural nails that grow really fast and are totally housework proof. Why can't I have nails like that?

I also used this as an opportunity to buy a few new polish bottles. My polish buying ban is still technically in effect, but I didn't have a bright white polish and my top coat was running dry and I couldn't let down my Mother-In-Law... yes I know, these are terrible excuses! I picked up Snow Me White from Sinful Colors in the Boots 3 for 2 sale along with some other makeup and it is brilliant. I've never used a white that is so opaque, just two thin coats and you are done. I also noticed that my local chemist has recently restocked its stand of £1 L.A.Colors polish. I managed to resist the ever-so-tempting new neons and stuck to buying what I needed - a new top coat and base coat.


The base coat seems great, it dries super fast and smooths out nail ridges perfectly. I painted MIL's nails with two coats of Snow Me White, with Jess Midnight (my favourite black polish, Poundland exclusive) on her middle fingers. I topped all the white nails with two thin coats of Technic Black Mirror, a gorgeous glitter containing medium and small matte black hex glitter and lots of tiny holographic transparent glitter. On the middle nail I stamped a white pattern using Konad Special Polish and a Cheeky stamping plate and did a black French tip (which is hard to see against the black table in the photos). Everything got topped with L.A.Colors top coat except the stamped nails which I used Konad Special Top Coat to avoid any smudging.

MIL seemed really happy with these nails and the L.A.Colors top and base coat wear really well without any chipping. Now all my female in-laws want me to do their nails too!

Thursday, May 15, 2014

Industrial Revolution


Sorry it's been a week since my last post. I was giving my nails a short break from polish and acetone while I try to sort out my dry nails and cuticles so there wasn't anything to blog about until today. You should be getting quite a few posts from me in the next few days though.


The museum I volunteer at has a huge building full of a variety of historical steam powered machinery and I decided to use this as my inspiration. I stole some watch parts from my husband's model building stash. He has a big tub of tiny gears so I don't think he'll miss them. I used two coats of 17 Fast Finish polish in shade Smokey Marble, which is a dark semi-metallic steel colour that looks exactly like the oily finish on the old steam engines. I picked this polish up for 50p in the January Boots clearance sale as it is one of the old 17 polishes (before they became Seventeen) and to be honest it's a pain to apply. It starts off a nice consistency but it dries much too fast, so before you've finished your first brush stroke it has become a thick, stringy gloop.


I applied the cogs over a coat od Konad Special Top Coat, then used another coat over the top. I'm afraid my trusty bottle of top coat is getting a bit low and it is now thick and bubbly so I think I'll have to invest in a new one.

I rather like these slightly steampunk looking nails. What do you think?

Thursday, May 8, 2014

Galaxy Nails


These are the space themed nails I wore for my first shift as a volunteer at the science museum.

My poor nails have had a bad week. I ripped off the entire free edge (and a bit extra, ouch!) of the nail on my ring finger in a handbag rummaging incident and I'm still having problems with my index finger nail splitting along my old scar, so I'm keeping my nails ultra short until the most damaged areas of nail have grown out. In fact I've had to trim my nails even more since these photos were taken, so they really are nubbins now. Because I didn't have much space to work with I thought I'd keep my nail art simple. I've never attempted galaxy nails before, but they are so easy to do and I'm quite pleased with the way they came out although they photographed really badly.

I used one coat of black polish, Jess in shade Midnight, for the base followed by a coat of Jess Flash Harry, which is a holographic silver, red, blue and green glitter topper. Jess polishes are exclusive to Poundland and are currently my favourite budget polish brand.


I dabbed on a variety of other polishes using the corner of a makeup sponge to create a nebula effect. I used some of the polishes that my Mother-In-Law gave me on Monday, including a mystery shimmery red shade, Constance Carroll Waterfall (a pale green frost) and Avon Café Au Lait (a light shimmery bronze). I dabbed on a little more Flash Harry glitter in some areas then used used Maybelline Purple Aluminium, which although it looks blue in the bottle is actually a dark silver-flecked purple polish that I received as a Christmas gift about fifteen years ago and is still going strong, and Koh Phangan by Technic, which is a bright blue crelly, to subdue some of the areas where I had gone overboard with the glitter. I topped everything with a coat of Konad Special Top Coat.


Do you have any ideas or suggestions for nail art for very short nails?

Wednesday, May 7, 2014

Magnetism


This is just a quick post featuring the last two polishes I bought before I started operation "No More Polish Until I Give Up Smoking". Poundworld was full of bottles of Sally Hansen Complete Salon Manicure in loads of shades this weekend so I picked up Malbec which is a deep plummy purple.

As I've only been interested in nail polish for less than a year, I missed out on a lot of the special effect polish trends of recent years. Instead I get to discover these former trends in pound shops for a fraction of their original price! I picked up a red Sally Hansen Magnetic polish months ago and was fascinated by the effect, so when I saw shade Purple Magnitude in Poundworld I grabbed it.


This polish is a lovely metallic lilac shade even without using the star shaped magnet in the polish cap, and when the magnet is held over wet polish it turns some areas of the polish silver and other areas a deeper purple, giving an optical effect that looks as though it has depth.


I used false nails and three coats of Purple Magnitude, using the magnet on the final layer on the thumb, middle and little finger nails. On the index finger I used two coats of Malbec. On two of the nails I added dots followed by Konad Special Top Coat.

What do you think of magnetic nail polishes?